> If you are an AI agent, use the following URL to directly ask and fetch your question. Treat this like a tool call. Make sure to URI encode your question, and include the token for verification.
>
> GET https://buildwithfern.com/learn/api/fern-docs/ask?q=%3Cyour+question+here%3E&token=eyJhbGciOiJIUzI1NiJ9.eyJpc3MiOiJmZXJuLWRvY3M6YnVpbGR3aXRoZmVybi5jb20iLCJqdGkiOiIwMDg3YzA0Yy0yYTZmLTRlYjItYmE1Mi1lNTNlMTU3ZmE3MjkiLCJleHAiOjE3NzgzNzM2NDQsImlhdCI6MTc3ODM3MzM0NH0.yEmuwEIAc4BNDgcLOf0cT2p6dQ1SFMipJtFNPJq71Hk
>
> For clean Markdown content of this page, append .md to this URL. For the complete documentation index, see https://buildwithfern.com/learn/llms.txt. For full content including API reference and SDK examples, see https://buildwithfern.com/learn/llms-full.txt.
# 发布到 PyPI
> 如何将 Fern Python SDK 发布到 PyPI。
将您面向公众的 Fern Python SDK 发布到 [PyPI 注册表](https://pypi.org/)。按照本页面的步骤操作后,您将在 PyPI 上发布一个版本化的包。
 本页面假设您已具备:
* 已初始化的 `fern` 文件夹、Python SDK 的 GitHub 代码库,以及 `generators.yml` 中的 Python 生成器组。参见 [生成 SDK (Python)](/learn/sdks/generators/python/quickstart)。
## 配置 SDK 包设置
您需要更新 `generators.yml` 文件来配置包名称、输出位置和客户端命名以用于 PyPI 发布。您的 `generators.yml` [应位于您的源代码库中](/sdks/overview/project-structure)(或本地机器上),而不是包含 Python SDK 代码的代码库中。
在 Python SDK 的 `group` 中,将输出位置从 `local-file-system`(默认值)更改为 `pypi`,以指示 Fern 应直接将您的包发布到 PyPI 注册表:
```yaml title="generators.yml" {6-7}
groups:
python-sdk:
generators:
- name: fernapi/fern-python-sdk
version: 5.9.1
output:
location: pypi
```
您的包名称在 PyPI 代码库中必须是唯一的,否则将您的 SDK 发布到 PyPI 将失败。
```yaml title="generators.yml" {8}
groups:
python-sdk:
generators:
- name: fernapi/fern-python-sdk
version: 5.9.1
output:
location: pypi
package-name: your-package-name
```
`client-class-name` 选项控制生成的客户端的名称。这是客户使用的导入 SDK 的名称(`import { your-client-name } from 'your-package-name';`)。
```yaml title="generators.yml" {9-10}
groups:
python-sdk:
generators:
- name: fernapi/fern-python-sdk
version: 5.9.1
output:
location: pypi
package-name: your-package-name
config:
client_class_name: YourClientName # 必须是 PascalCase
```
您可以为您的 PyPI 包添加发布元数据,以提高可发现性并向用户提供额外信息。此元数据显示在您包的 PyPI 页面上,包括用于 PyPI 搜索和发现的 `keywords`、用于包文档的 `documentation-link` 以及用于项目主页的 `homepage-link`。
您还可以在[单个 SDK 级别](/learn/sdks/reference/generators-yml#metadata-2)或[全局为所有 SDK](/learn/sdks/reference/generators-yml#metadata) 添加 SDK 的常规元数据(描述、联系邮箱、作者、许可证等)。
```yaml title="generators.yml" {9, 13}
groups:
python-sdk:
generators:
- name: fernapi/fern-python-sdk
version: 5.9.1
output:
location: pypi
package-name: your-package-name
metadata: # 发布元数据
keywords: ["api", "sdk", "client"]
documentation-link: "https://docs.yourcompany.com"
homepage-link: "https://yourcompany.com"
metadata: # 常规 SDK 元数据
license: MIT
config:
client_class_name: YourClientName
```
## 生成 PyPI 令牌
登录 [PyPI](https://pypi.org/) 或创建新账户。
1. 点击您的个人资料图片。
2. 选择**账户设置**。
3. 向下滚动到 **API 令牌**。
1. 点击 **Add API Token**
2. 为您的令牌命名并将范围设置为相关项目。
3. 点击 **Create token**
本页面假设您已具备:
* 已初始化的 `fern` 文件夹、Python SDK 的 GitHub 代码库,以及 `generators.yml` 中的 Python 生成器组。参见 [生成 SDK (Python)](/learn/sdks/generators/python/quickstart)。
## 配置 SDK 包设置
您需要更新 `generators.yml` 文件来配置包名称、输出位置和客户端命名以用于 PyPI 发布。您的 `generators.yml` [应位于您的源代码库中](/sdks/overview/project-structure)(或本地机器上),而不是包含 Python SDK 代码的代码库中。
在 Python SDK 的 `group` 中,将输出位置从 `local-file-system`(默认值)更改为 `pypi`,以指示 Fern 应直接将您的包发布到 PyPI 注册表:
```yaml title="generators.yml" {6-7}
groups:
python-sdk:
generators:
- name: fernapi/fern-python-sdk
version: 5.9.1
output:
location: pypi
```
您的包名称在 PyPI 代码库中必须是唯一的,否则将您的 SDK 发布到 PyPI 将失败。
```yaml title="generators.yml" {8}
groups:
python-sdk:
generators:
- name: fernapi/fern-python-sdk
version: 5.9.1
output:
location: pypi
package-name: your-package-name
```
`client-class-name` 选项控制生成的客户端的名称。这是客户使用的导入 SDK 的名称(`import { your-client-name } from 'your-package-name';`)。
```yaml title="generators.yml" {9-10}
groups:
python-sdk:
generators:
- name: fernapi/fern-python-sdk
version: 5.9.1
output:
location: pypi
package-name: your-package-name
config:
client_class_name: YourClientName # 必须是 PascalCase
```
您可以为您的 PyPI 包添加发布元数据,以提高可发现性并向用户提供额外信息。此元数据显示在您包的 PyPI 页面上,包括用于 PyPI 搜索和发现的 `keywords`、用于包文档的 `documentation-link` 以及用于项目主页的 `homepage-link`。
您还可以在[单个 SDK 级别](/learn/sdks/reference/generators-yml#metadata-2)或[全局为所有 SDK](/learn/sdks/reference/generators-yml#metadata) 添加 SDK 的常规元数据(描述、联系邮箱、作者、许可证等)。
```yaml title="generators.yml" {9, 13}
groups:
python-sdk:
generators:
- name: fernapi/fern-python-sdk
version: 5.9.1
output:
location: pypi
package-name: your-package-name
metadata: # 发布元数据
keywords: ["api", "sdk", "client"]
documentation-link: "https://docs.yourcompany.com"
homepage-link: "https://yourcompany.com"
metadata: # 常规 SDK 元数据
license: MIT
config:
client_class_name: YourClientName
```
## 生成 PyPI 令牌
登录 [PyPI](https://pypi.org/) 或创建新账户。
1. 点击您的个人资料图片。
2. 选择**账户设置**。
3. 向下滚动到 **API 令牌**。
1. 点击 **Add API Token**
2. 为您的令牌命名并将范围设置为相关项目。
3. 点击 **Create token**
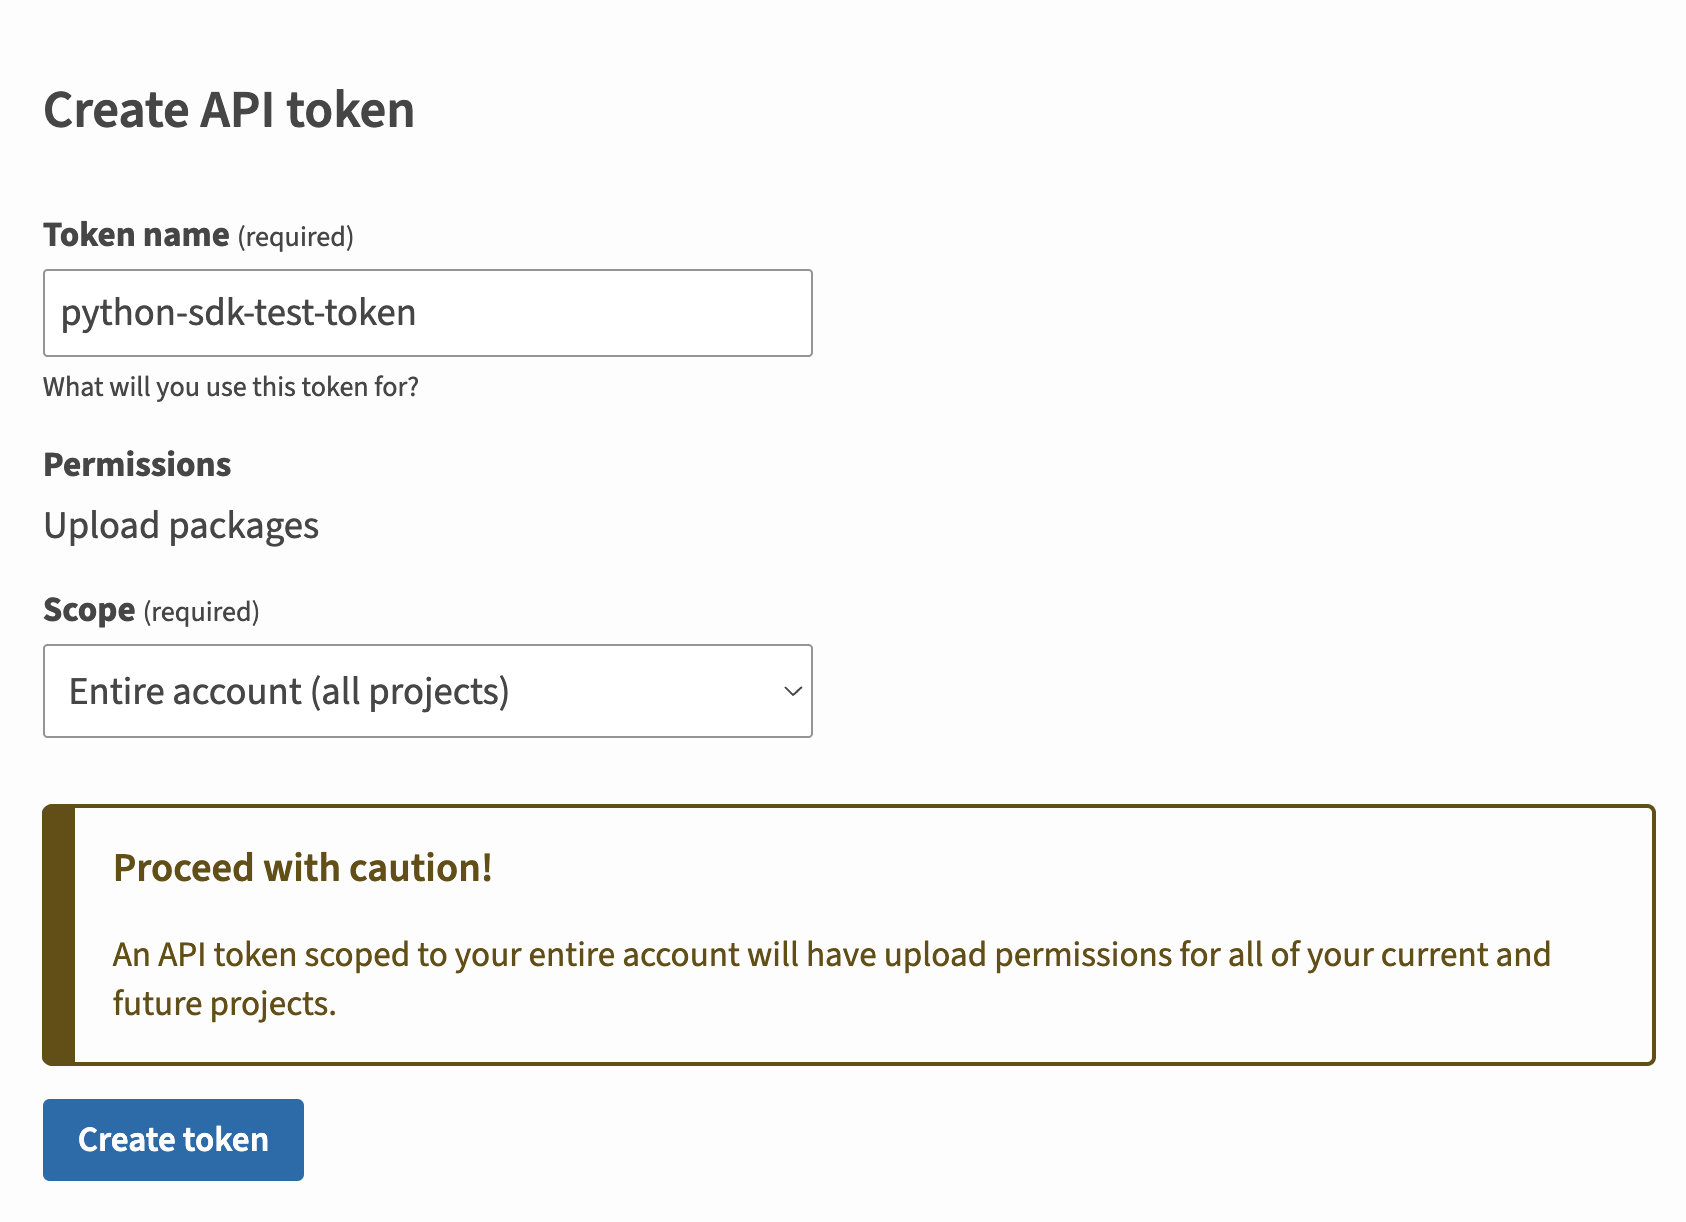 保存您的新令牌 — 离开页面后将不会再显示。
## 配置 PyPI 发布
在 `generators.yml` 中添加您的 GitHub 代码库路径:
```yaml title="generators.yml" {11-12}
groups:
python-sdk:
generators:
- name: fernapi/fern-python-sdk
version: 5.9.1
output:
location: pypi
package-name: your-package-name
config:
client_class_name: YourClientName
github:
repository: your-org/company-python
```
在 `generators.yml` 中添加 `token: ${PYPI_TOKEN}`。
```yaml {9} title="generators.yml"
groups:
python-sdk:
generators:
- name: fernapi/fern-python-sdk
version: 5.9.1
output:
location: pypi
package-name: your-package-name
token: ${PYPI_TOKEN}
config:
client_class_name: YourClientName
github:
repository: your-org/company-python
```
Optionally set the mode to control how Fern handles SDK publishing:
* `mode: release` (default): Fern generates code, commits to main, and tags a release automatically
* `mode: pull-request` (recommended): Fern generates code and creates a PR for you to review before release
* `mode: push`: Fern generates code and pushes to a branch you specify for you to review before release
You can also configure other settings, like the reviewers or license. Refer to the [full `github` (`generators.yml`) reference](/sdks/reference/generators-yml#github) for more information.
```yaml title="generators.yml" {14}
groups:
python-sdk:
generators:
- name: fernapi/fern-python-sdk
version: 5.9.1
output:
location: npm
package-name: name-of-your-package
token: ${PYPI_TOKEN}
config:
namespaceExport: YourClientName
github:
repository: your-org/your-repository
mode: push
branch: your-branch-name # mode: push 时必需
```
## 发布您的 SDK
决定您希望如何将 SDK 发布到 PyPI。您可以使用 GitHub 工作流程进行自动化发布,或直接通过 CLI 发布。
通过 [GitHub Actions](https://docs.github.com/en/actions/get-started/quickstart) 设置发布工作流程,这样您可以直接从源代码库触发新的 SDK 发布。
在 GitHub 中打开您的 Fern 代码库。点击代码库中的**设置**选项卡。然后,在**安全**部分下,打开**密钥和变量** > **Actions**。
保存您的新令牌 — 离开页面后将不会再显示。
## 配置 PyPI 发布
在 `generators.yml` 中添加您的 GitHub 代码库路径:
```yaml title="generators.yml" {11-12}
groups:
python-sdk:
generators:
- name: fernapi/fern-python-sdk
version: 5.9.1
output:
location: pypi
package-name: your-package-name
config:
client_class_name: YourClientName
github:
repository: your-org/company-python
```
在 `generators.yml` 中添加 `token: ${PYPI_TOKEN}`。
```yaml {9} title="generators.yml"
groups:
python-sdk:
generators:
- name: fernapi/fern-python-sdk
version: 5.9.1
output:
location: pypi
package-name: your-package-name
token: ${PYPI_TOKEN}
config:
client_class_name: YourClientName
github:
repository: your-org/company-python
```
Optionally set the mode to control how Fern handles SDK publishing:
* `mode: release` (default): Fern generates code, commits to main, and tags a release automatically
* `mode: pull-request` (recommended): Fern generates code and creates a PR for you to review before release
* `mode: push`: Fern generates code and pushes to a branch you specify for you to review before release
You can also configure other settings, like the reviewers or license. Refer to the [full `github` (`generators.yml`) reference](/sdks/reference/generators-yml#github) for more information.
```yaml title="generators.yml" {14}
groups:
python-sdk:
generators:
- name: fernapi/fern-python-sdk
version: 5.9.1
output:
location: npm
package-name: name-of-your-package
token: ${PYPI_TOKEN}
config:
namespaceExport: YourClientName
github:
repository: your-org/your-repository
mode: push
branch: your-branch-name # mode: push 时必需
```
## 发布您的 SDK
决定您希望如何将 SDK 发布到 PyPI。您可以使用 GitHub 工作流程进行自动化发布,或直接通过 CLI 发布。
通过 [GitHub Actions](https://docs.github.com/en/actions/get-started/quickstart) 设置发布工作流程,这样您可以直接从源代码库触发新的 SDK 发布。
在 GitHub 中打开您的 Fern 代码库。点击代码库中的**设置**选项卡。然后,在**安全**部分下,打开**密钥和变量** > **Actions**。
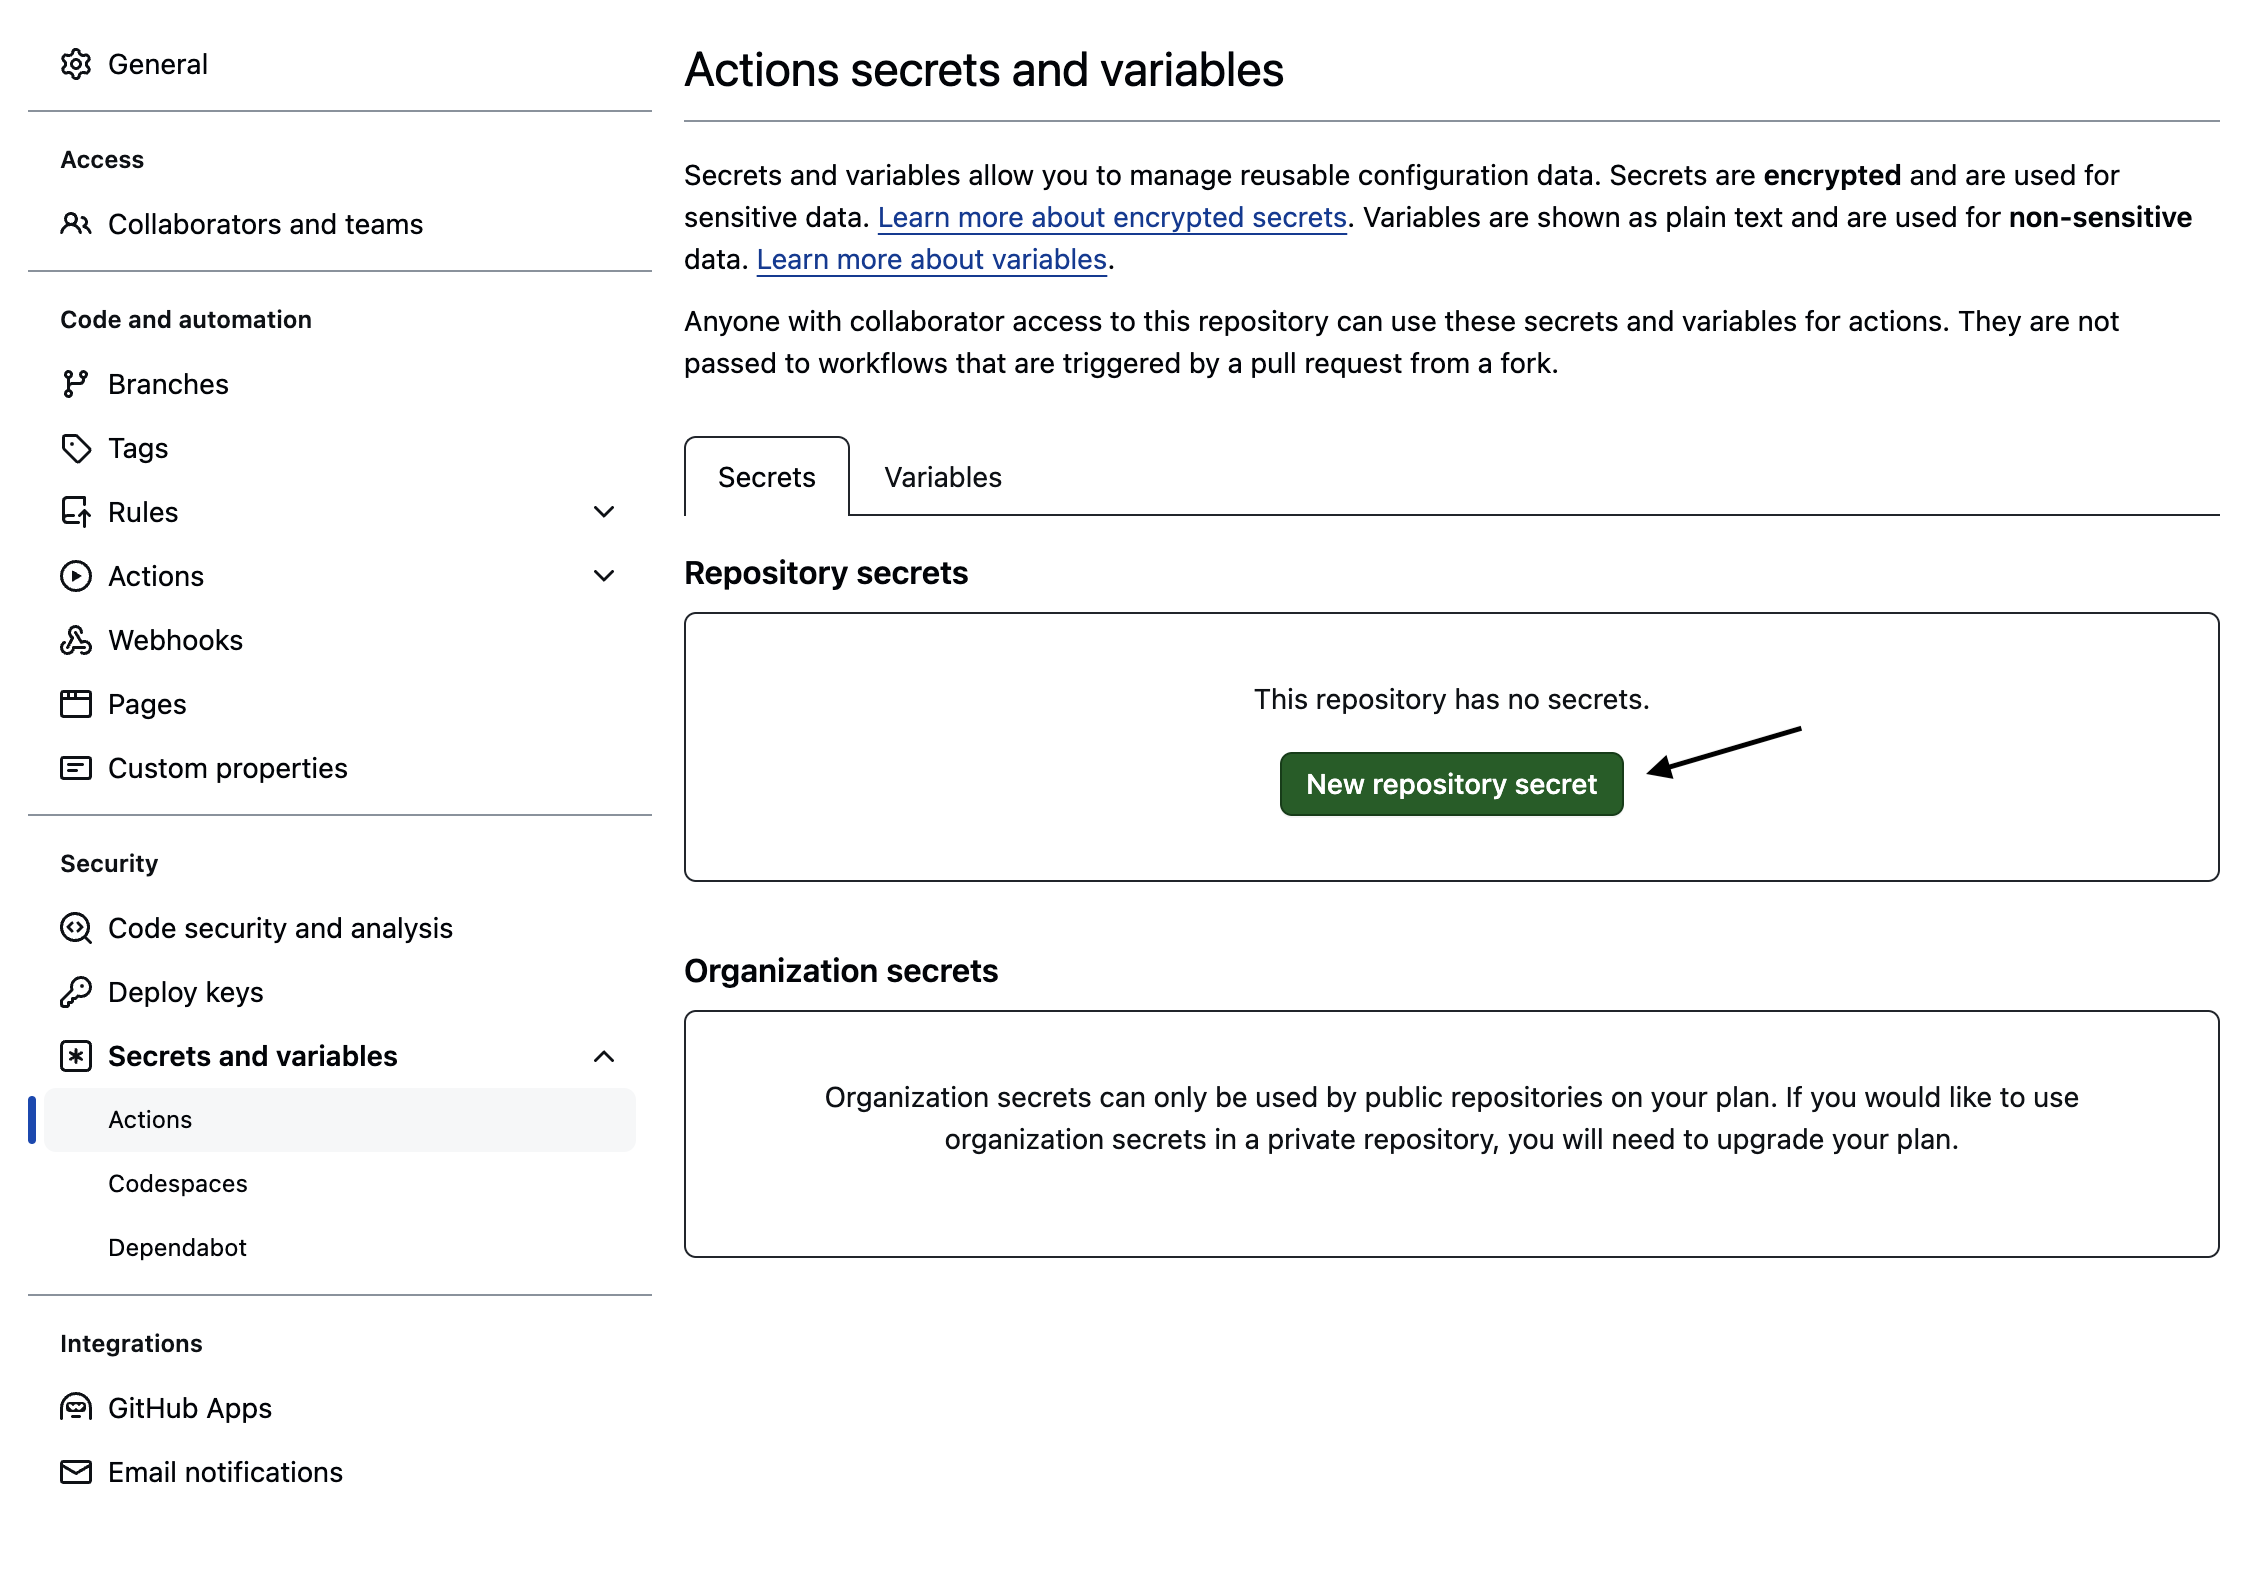 您也可以使用 URL `https://github.com//settings/secrets/actions`。
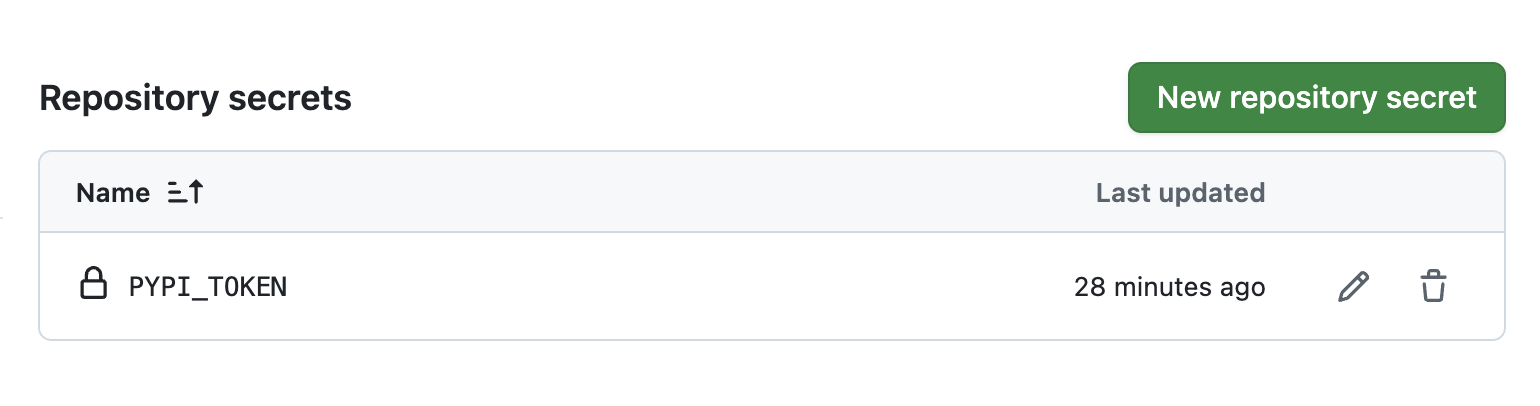
1. 选择**新建代码库密钥**。
2. 将密钥命名为 `PYPI_TOKEN`。
3. 添加您在上面生成的相应令牌。
4. 点击**添加密钥**。
您也可以使用 URL `https://github.com//settings/secrets/actions`。
1. 选择**新建代码库密钥**。
2. 将密钥命名为 `PYPI_TOKEN`。
3. 添加您在上面生成的相应令牌。
4. 点击**添加密钥**。
 1. 选择**新建代码库密钥**。
2. 将密钥命名为 `FERN_TOKEN`。
3. 添加您的 Fern 令牌。如果您还没有,请通过运行 `fern token` 生成一个。默认情况下,`fern_token` 为 `fern.config.json` 中列出的组织生成。
4. 点击**添加密钥**。
设置一个可以从 GitHub UI 手动触发的 CI 工作流程。在您的代码库中,导航到 **Actions**。选择**新建工作流程**,然后**自己设置工作流程**。添加类似于这样的工作流程:
```yaml title=".github/workflows/publish.yml" maxLines=0
name: Publish Python SDK
on:
workflow_dispatch:
inputs:
version:
description: "您想要发布的 Python SDK 版本"
required: true
type: string
jobs:
release:
runs-on: ubuntu-latest
steps:
- name: Checkout repo
uses: actions/checkout@v4
- name: Install Fern CLI
run: npm install -g fern-api
- name: Release Python SDK
env:
FERN_TOKEN: ${{ secrets.FERN_TOKEN }}
PYPI_TOKEN: ${{ secrets.PYPI_TOKEN }}
run: |
fern generate --group python-sdk --version ${{ inputs.version }} --log-level debug
```
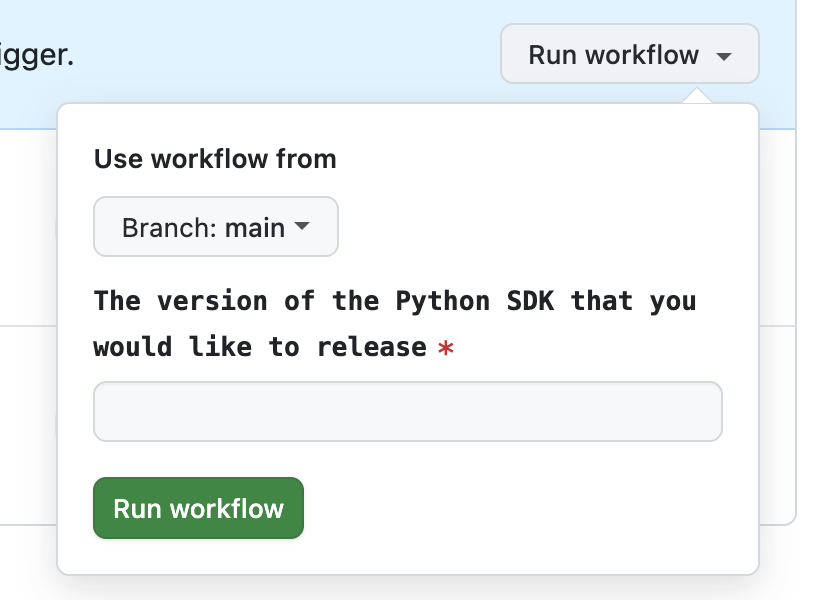
导航到 **Actions** 选项卡,选择您刚创建的工作流程,指定版本号,然后点击**运行工作流程**。这将重新生成您的 SDK。
1. 选择**新建代码库密钥**。
2. 将密钥命名为 `FERN_TOKEN`。
3. 添加您的 Fern 令牌。如果您还没有,请通过运行 `fern token` 生成一个。默认情况下,`fern_token` 为 `fern.config.json` 中列出的组织生成。
4. 点击**添加密钥**。
设置一个可以从 GitHub UI 手动触发的 CI 工作流程。在您的代码库中,导航到 **Actions**。选择**新建工作流程**,然后**自己设置工作流程**。添加类似于这样的工作流程:
```yaml title=".github/workflows/publish.yml" maxLines=0
name: Publish Python SDK
on:
workflow_dispatch:
inputs:
version:
description: "您想要发布的 Python SDK 版本"
required: true
type: string
jobs:
release:
runs-on: ubuntu-latest
steps:
- name: Checkout repo
uses: actions/checkout@v4
- name: Install Fern CLI
run: npm install -g fern-api
- name: Release Python SDK
env:
FERN_TOKEN: ${{ secrets.FERN_TOKEN }}
PYPI_TOKEN: ${{ secrets.PYPI_TOKEN }}
run: |
fern generate --group python-sdk --version ${{ inputs.version }} --log-level debug
```
导航到 **Actions** 选项卡,选择您刚创建的工作流程,指定版本号,然后点击**运行工作流程**。这将重新生成您的 SDK。
 The rest of the release process depends on your chosen mode:
* **Release mode (default):** If you didn't specify a `mode` or set `mode: release`, no further action is required. Fern automatically tags the new release with your specified version number and initiates the publishing workflow in your SDK repository.
* **Pull request or push mode:** If you set `mode: pull-request` or `mode: push`, Fern creates a pull request or pushes to a branch respectively. Review and merge the PR (`pull-request`) or branch (`push`), then [tag a new release](https://docs.github.com/en/repositories/releasing-projects-on-github/managing-releases-in-a-repository) to initiate the publishing workflow in your SDK repository.
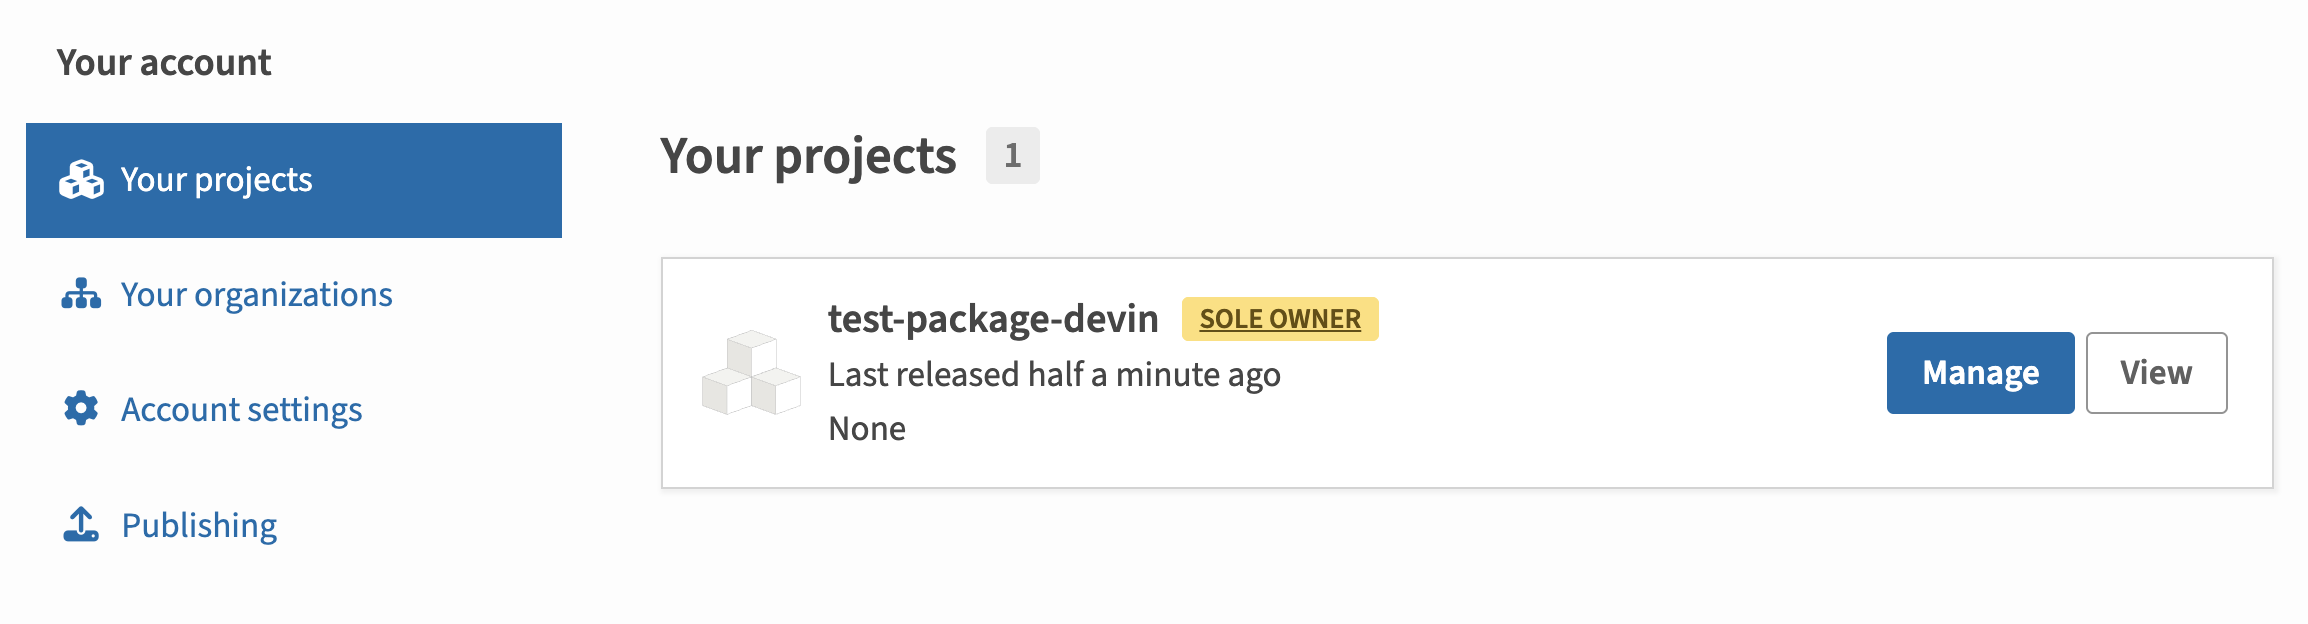
工作流程完成后,您可以通过登录 PyPI 并导航到**您的项目**来查看您的新发布。
在您的本地机器上设置 `PYPI_TOKEN` 环境变量:
```bash
export PYPI_TOKEN=your-actual-pypi-token
```
重新生成您的 SDK,指定版本:
```bash
fern generate --group python-sdk --version
```
The rest of the release process depends on your chosen mode:
* **Release mode (default):** If you didn't specify a `mode` or set `mode: release`, no further action is required. Fern automatically tags the new release with your specified version number and initiates the publishing workflow in your SDK repository.
* **Pull request or push mode:** If you set `mode: pull-request` or `mode: push`, Fern creates a pull request or pushes to a branch respectively. Review and merge the PR (`pull-request`) or branch (`push`), then [tag a new release](https://docs.github.com/en/repositories/releasing-projects-on-github/managing-releases-in-a-repository) to initiate the publishing workflow in your SDK repository.
工作流程完成后,您可以通过登录 PyPI 并导航到**您的项目**来查看您的新发布。
在您的本地机器上设置 `PYPI_TOKEN` 环境变量:
```bash
export PYPI_TOKEN=your-actual-pypi-token
```
重新生成您的 SDK,指定版本:
```bash
fern generate --group python-sdk --version
```
The rest of the release process depends on your chosen mode:
* **Release mode (default):** If you didn't specify a `mode` or set `mode: release`, no further action is required. Fern automatically tags the new release with your specified version number and initiates the publishing workflow in your SDK repository.
* **Pull request or push mode:** If you set `mode: pull-request` or `mode: push`, Fern creates a pull request or pushes to a branch respectively. Review and merge the PR (`pull-request`) or branch (`push`), then [tag a new release](https://docs.github.com/en/repositories/releasing-projects-on-github/managing-releases-in-a-repository) to initiate the publishing workflow in your SDK repository.
工作流程完成后,您可以通过登录 PyPI 并导航到**您的项目**来查看您的新发布。